Thursday, February 27, 2014

Oranges in Tucson

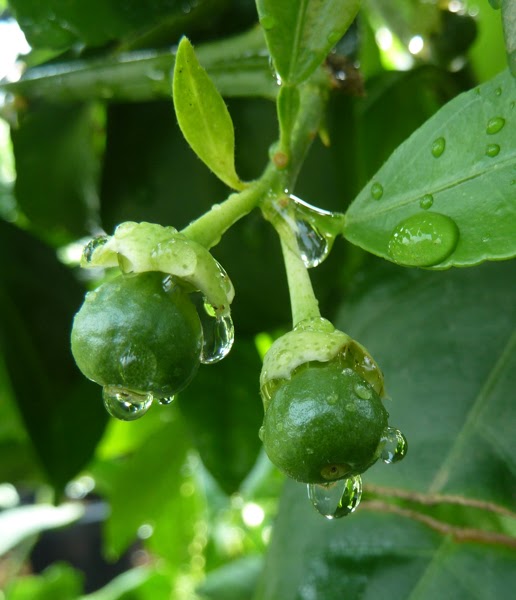
Can you identify this fruit?
When I first moved to Tucson (long before I discovered my passion for plants), I was truly excited by the large, evergreen tree that shaded our tiny yard. I had no idea what kind of tree it was until I spotted the little green fruit; it was a lime tree. However, even after they got larger, they were the hardest limes that were ever grown on earth (ever). A couple of weeks later the fruit began turning yellow, and we laughed about having thought they were limes (of course ...they were just unripe lemons). When the fruit subsequently began turning orange, we just felt dumb.

I've since gotten a little better at citrus ID, and I've also learned a bit about the cultivars that grow well in a Tucson garden. I've recently been compiling a list of the most commonly grown and sold cultivars for the home garden market, and the merits of each.


This is the first of a multi-part series of posts I'll be making throughout the month of March to share some of what I've learned, starting with oranges! Of course, this list isn't all-inclusive, and I expect to update it from time to time as my research continues. I've started the list with a focus on cultivars that have proven themselves in our climate, and are easily found for sale here in town.

So, without further ado, here's my list of oranges to grow in your Old Pueblo garden:

Navel orange is one of the best types of citrus for eating fresh because it’s easy to peel and seedless. This is the type of orange that we typically buy at the grocery store. The juice is also tasty, but it doesn’t store well, so there are much better choices for juicing. Navel orange is often sold as just navel orange, with no cultivar name.
Washington navel orange blossom

  • Cara Cara is the only pigmented navel orange; its flesh looks similar to red grapefruit, but it tastes and peels like a navel. Originally from Venezuela, this is a relatively new variety that was discovered as a mutation on a Washington navel. Ripens December to January.  
  • Washington is the variety you likely have if you purchased a navel orange with no cultivar name. It’s the most popular variety of navel orange we grow. The large fruit has good quality and flavor, ripening from November to January in the low desert.


Arizona Sweet is a name we use to describe several kinds of oranges that have a delicious sweet flavor. They do have some seeds, and they’re slightly harder to peel, but these oranges are still great for eating fresh. They’re better for juicing than the navel oranges, but not quite as juicy as a Valencia. Although there are several cultivars, these oranges are often sold with the name ‘Arizona Sweet’ rather than the true cultivar name for the tree.
Cluster of blossoms on a Trovita orange
  • Hamlin has lower acidity, which gives it a very sweet flavor. The tree is vigorous and productive, medium large in size, and slightly more cold-tolerant than some of our other oranges. The medium sized fruit has 0-6 seeds, and though they’re smaller in the low desert than in more humid environments, the flavor is still excellent. Harvest from November to January in the low desert.
  • Marrs ripens earlier than the other sweet oranges (from late October to early February in our climate), but the fruit holds well on the tree, and will have better flavor if harvested in November rather than October. The medium to large fruit is sweet and juicy, low in acidity, with a moderately thick rind and 7-10 seeds (though seediness can vary depending on cross-pollination…more cross-pollinators will make more seeds). It has a tendency to bear fruit in heavy clusters that can give branches a “drooping” appearance.
  • Trovita is one of the best sweet oranges for the low desert. It’s more productive in our high heat and low humidity, but this variety does tend to bear heavily in alternating years. Fruit is medium to large and juicy with a thin rind and 6-10 seeds. The flavor is mild but sweet, ripening from December to February.


This will be delicious juice some day...(Valencia orange blossom)
Valencia is the best orange if you want oranges for juicing. The fruit is full of bright orange juice with lots of sugary goodness that stores well. It ripens late, reaching maturity around March. Though there are several cultivars of Valencia, the home garden market usually lumps them all together as ‘Valencia’ and sells them as such. The medium-sized fruit is extremely juicy with 0-6 seeds.

Blood Oranges don’t always give us Arizonans the deep red pigments that they’re so famous for (they often require a bit of a cooler climate for good color), but the fruit is just as tasty! Their red pigmentation comes from the presence of anthocyanin, which is the same pigment that gives pomegranate its deep red color. There are several cultivars that are easy to find here in Tucson.
  • Moro is the most reliable blood orange for darker color in our warm climate. The rind and flesh can turn anywhere from bright red to dark purple in January to February (when they ripen). The flavor is berry-like with a hint of spice, and it has few seeds (if any). It tends to bear fruit in clusters, and produces larger crops on alternating years. 
  • Sanguinelli ripens a little later than the other blood oranges (Jan to March). It has medium-sized, egg-shaped fruit with only a few seeds. ‘Sanguinelli’ is said to be slightly less acidic (sweeter) than ‘Moro’, and more reliable than ‘Tarocco’ for red pigmentation. Small to medium sized tree that is very productive.
  • Tarocco originally came from the Mediterranean, so it’s well adapted to our climate. The rind is fairly easy to peel, and its color is primarily orange with little (if any) red pigmentation. The fruit is the largest of the blood oranges, and many agree that it’s also the sweetest. There are few to no seeds, and harvest time is in January or February. Though it’s said that ‘Tarocco’ is less productive than other blood oranges, it will still produce more than enough fruit for a home garden.

Wednesday, February 12, 2014

More Fertilizing Tips for Citrus

In February's issue of Tucson Happenings, I discussed fertilizing citrus trees in spring, and I decided that this is an important enough topic to impart a few extra tips on this month's blog.

To begin, I'd like to link University of Arizona's Fertilizing Citrus Chart, which I mentioned in the Tucson Happenings article.  It's a no-nonsense way of figuring out how many pounds of fertilizer you should apply to get the right amount of nitrogen to your tree. Keep in mind that this is the amount of fertilizer you should use in a year, and you'll be feeding 2 more times this year (so you only need 1/3 of the recommended amount each time).

Lisbon Lemon branch with swelling leaf bud.
I also mentioned in my article that the best timing of springtime fertilizer is just before the buds begin to swell, but I didn't have enough room to describe a citrus bud in any detail.

It's easy to notice swelling buds on deciduous trees with barren branches. Citrus trees hold leaves through the winter, however, so their buds are less exposed. You can see the swelling bud on this lemon stem just above the leaf scar.

Citrus trees will begin actively growing when temperatures are staying above about 55° F, so it might be easier for beginners to keep an eye on the weather than it is to watch the buds. Though it's common to hear that you should feed on Valentine's Day, it's better to watch for the right weather and these first signs of new growth. After a warm winter, like the one we've just experienced, you may want to feed a bit earlier in February to give your tree some great fuel for making new foliage.

If you're working with an organic fertilizer, you probably already know that it's not necessary to be so precise in the timing of application. You can feed with organic fertilizers even earlier in the year, because it takes them longer to break down in the soil.


The dripline of the tree is where many of the
absorbing roots are concentrated.

The last thing I'd like to touch on in this post is exactly where and how to spread the fertilizer once you've used the Fertilizing Citrus Chart to figure out how much of your fertilizer to use. You'll have to excuse my extremely rudimentary photo editing skills, but the red lines coming down from the ends of the branches at the right and left are meant to show the dripline of the tree. The dripline is the area under a tree where water would drip off of the ends of the branches (if we ever got any rain...).


If you have gravel, use a hard rake to expose the soil under the tree and a few inches beyond the dripline, avoiding the area just around the trunk. Spread the fertilizer evenly over the exposed soil, and use the rake to scratch it about an inch into the soil.  Make sure you water deeply and thoroughly all the way out to that drip line and beyond, everywhere that you spread the fertilizer (again, avoiding the area just around the trunk). Wait until the soil has dried out a bit before raking gravel back into place or walking under the tree.

Now you can put away the citrus fertilizer until Memorial Day!


Saturday, January 25, 2014

Geeking Out: Why does a well-hydrated plant survive colder temperatures than a thirsty one?

As I prepare for my upcoming Chemistry class, I thought it would be good practice to do a little bit of research into what happens to a plant at the cellular level when it freezes. Having no idea how complex the subject would be, I promised to share this information with any of you other geeks who might be interested (I know there are at least a couple of you out there). 

There are a lot of online articles covering the practical things you need to know about protecting your plants from frost damage, including a great publication by Linda Reddick, published by the Arizona Cooperative Extension.  While some people wouldn't consider it to be practical knowledge, this post is about how the plant's cells are damaged.  Why does a well-hydrated plant resist freezing better than one that is thirsty?

I've read this fact in numerous publications, and I've witnessed it to be true, but I had little understanding of exactly why it's true.  The answer is much more complex than I had thought. Beyond the fact that a well-hydrated plant simply functions better than one that is thirsty, there's a lot to know about how hydration relates to frost damage.

There are several ways that plant cells can be damaged by colder temperatures, but they do have a few tricks up their...uhh...cell membranes.  One of these tricks takes advantage of osmosis to decrease the temperature at which its insides can freeze.

This happens when ice crystals begin to form in the spaces between plant cells.  The solutes that were previously suspended within the water molecules are left behind when these crystals form.  Water molecules outside of the cells continue to form crystals, until the concentration of solutes (sugars, etc) in the water left behind lowers the solution's freezing temperature enough to keep a small amount of (highly concentrated) solution lingering between plant cells.  *Phew, that was a long sentence*

This extracellular solution begins to draw water from inside of the cell because its osmotic pressure is higher than the solution within the cell.  In turn, the solute concentration increases within the cell and lowers the freezing temperature.  

With this in mind, it’s easy to see how a well-hydrated plant cell would be better prepared for freezing temperatures than one that has little water to begin with.  A well-hydrated cell can give up more water without suffering damage associated with severe dehydration.

Of course, there are other ways that freezing temperatures can damage plant cells…but we’ll have to save that for another edition of Geeking Out.  For now, we've answered the question of exactly why a well-hydrated plant has better chances than a thirsty one when the temperatures get low.  

I'll leave you with one parting thought that should make a little bit of sense if you've read through this post.  Plants that are resistant to freeze damage are often also fairly tolerant of drought.

Friday, December 20, 2013

Protecting your plants from the cold

Being prepared isn't pretty...
Ideally, a post about frost protection should come before we have our first freezing temperatures of the season, but better late than never, right?  This year, I was determined not to be scrambling for old sheets at the last minute, covering "the lucky ones" by flashlight.  Preparation for the first freeze was meticulous and time consuming, but now I'm ready for anything this winter throws at me!

Unfortunately, this means that most of my potted plants are crowded together in one small nook of the patio, and others are getting leggy in the house; but we all know that the most practical choices aren't always the sexiest.  Regardless of how the yard looks in winter, effectively protecting plants from freezing will ensure that they still look attractive in spring.


the plant on top sometimes goes without water a little too long...
I call this "The stairway to heaven",
because the plant on top is pretty hard to reach...
I live in a warmer pocket of Tucson, but I grow a lot of tender plants and succulents in containers, so my first chore in preparing for the mercury to drop is to group my potted plants according to their protection needs.  Since I don't have a greenhouse, my wimpiest plants come inside the house for the winter.  If you plan to do the same, you'll want to locate them in a non-drafty spot that receives bright light without getting direct sun through the window.  Mine go on a spiral stand in a west-facing window with a light shade to block direct afternoon sun.  It's easy to overwater in the winter, especially with plants that are accustomed to being outdoors, so check for moisture before watering, and only water when the top inch of soil is dry.  I tend to water every 10-14 days, unless a droopy plant tells me otherwise.  Sometimes, plants can get fussy and drop some leaves when they're moved.  Check the spot's draftiness and temperature and make sure you're watering correctly.  The plant will likely put on new growth when it gets moved back to its regular spot.


This group gets covered when the temperatures
drop below 45 F.


I group the remaining tender plants in the warmest nook of my patio, so it's easier to throw a frost cloth over them when they need it.  Areas that are protected from winds will typically stay warmer, and walls or covered patios can help to reflect some heat in the day and retain some through the night.  The sunniest spot of the patio or yard is often the warmest, but be careful to protect your plants from sunburn if you move them from a shady home to a sunnier one for the winter.  Again, check plants for moisture before watering so that you don't over-do it.


Frost cloth is porous and lightweight

 Now, it's time to talk covers!  Frost cloth is the best choice, but there are other things you can use in a pinch; newspaper, cardboard, wood, burlap, sheets, buckets, plastic bottles cut in half...the list goes on.  Frost cloth is best because it's lightweight and doesn't absorb water, so it still works in the rain or (dare I say it...) snow.


Sheets, cardboard and burlap don't insulate as well when they're wet, and they can become heavy when soaked with water.  Plastic can be used with a frame to make a mini greenhouse over a plant (I've seen this done very elegantly with a lawn chair and a mulch bag), but don't use plastic to drape over the plant like you would a sheet, or you'll get some frozen/burned leaves.


oops
This poor Manfreda got burned when a dark colored
frost cloth was left on in the full sun. 
Don't worry though, it'll recover!
Covers work by trapping radiant heat from the ground, so make sure that whatever cover you use touches the ground all around the plant to trap the heat inside.  When using frost cloth or sheets, I like to have some clothes pins and a few big rocks or bricks handy to hold the covers in place.  If you're covering something that will be in direct morning sun, it's a good idea to pick a light color, or you might have some burned leaves by the time you uncover the plant (especially if you tend to sleep in on cold, wintry mornings, like some people I know...).


On the subject of uncovering, it's best if you do this chore daily.  It's OK to leave plants covered for a couple of days if freezing temperatures are expected, but they'll be a lot happier if you allow them some fresh air and sunlight in the daytime when temperatures are warmer.  Since covering works by trapping heat, it helps to let the ground around the plant soak up as much sunlight as possible throughout the day.


Celebrations C9 Light set at Acehardware.com
If radiant heat from the ground isn't enough, or if you're trying to protect something too large or tall to completely cover (such as a citrus tree), a string of old-school fluorescent Christmas lights can help generate some extra warmth that can be trapped under whatever cover you have.  LED lights are much easier to find, but they don't generate nearly as much heat.  I've seen some other "clever" heat generators do the job (garden lighting directed at the plant, flashlights hanging from branches), but fluorescent Christmas lights seem like the safest, most effective, and most festive option to me.


Lastly, I'd like to note that a thirsty plant will be damaged from the cold much faster and easier than one that is well-hydrated.  Try to check on moisture levels a day or so before a freeze is expected; it's best if a plant isn't too soggy or completely dry when the temperature drops.  Check out my next blog post for some geeky science behind how and why thirsty plants freeze faster than well-hydrated ones.

Here are some of my artsy photo extras from this post:
this poor guy thinks he can escape the stairway by climbing down the rail...
Philodendron hederaceum (aka Philodendron scandens)

I can't wait for this guy to grow up.  He lives on one of the lowest stairs,
where he's easy to see and reach.


lives near the bottom shelf
Mr. Chomps lives near the bottom shelf, too.

Sunday, December 1, 2013

Living Christmas Trees Need a Little Love

In December's Tucson Happenings article, I talked about the differences between the types of living holiday trees you can buy, and how to care for these trees while they're in your home.  However, there wasn't enough room for details about what to expect from these trees once they're installed in the ground.

So, here's that list of trees again with a few more photos and some details!  Keep in mind that this list isn't all-inclusive, there are many more trees or shrubs that could serve well as a holiday tree and look great in the garden afterwards.  These are just some of my personal favorites.  What trees or shrubs would you add to the list?

Doedar Cedar (Cedrus deodara) - This one is on the list for its smell and shape, though in the container it might look more like Charlie Brown's tree than some others on the list.  It's also one of the more frost sensitive trees on the list, but it's hardy to 5 F.  Mature trees are drought and heat tolerant.
Mature Height:  around 40-50 feet in Tucson, much taller in its native habitat and warm climates
Mature Width:  20-30 feet

Arizona Cypress at the University of Arizona


Arizona Cypress (Cupressus arizonica) - This tree should be easy to find at local nurseries, but probably won't be displayed with the holiday trees.  I think it has the right shape, though, and it makes a great screen or windbreak once it's in the landscape.  It may not be exactly what you think of when you imagine a holiday tree, but it gets extra super cool points for being native!
Mature Height:  40-50 feet
Mature Width:  20-30 feet


I'd love to show a photo of this tree's beautiful bark,
but, alas, you're going to have to google it...
(I don't seem to have a bark photo
on hand, but it's worth looking up!)


Alligator Juniper (Juniperus deppeana) - This is another Charlie Brown favorite that won't be displayed with the holiday trees.  In fact, there are probably only a few nurseries in town who carry it, but I had to add it to my list because I feel compelled to promote cool native plants whenever I can.  Named for its distinctive bark, this drought-tolerant evergreen makes a big impression and needs plenty of room to grow, but will take its sweet time getting there.
Mature Height: 20-50 feet
Mature Width:  20-50 feet


Pinion Pine (Pinus edulis) - This is the smallest tree on the list.  It doesn't enjoy the heat at lower elevations, so I'm recommending it only for those in the cooler microclimates of Tucson and surrounding areas.  The seeds are edible and delicious!
Mature Height:  20-30 feet
Mature Width:  15-25 feet


Eldarica pine at the University of Arizona


Eldarica Pine (Pinus eldarica) - Probably the most commonly found living tree for the holiday market in Tucson.  The large mature canopy of this evergreen stays a bit more narrow than the other pine we commonly see around the Old Pueblo (Aleppo pine, or Pinus halepensis).

Mature Height:  30-50 feet
Mature Width:  15-30 feet


I bet you'll never guess where this photo of Aleppo Pine was taken...


Aleppo Pine (Pinus halepensis) - Another evergreen that grows well here; the cloud-like canopy should be a very familiar sight to Tucsonans.  It gives great shade, but needs a lot of space.
Mature Height:  30-60 feet
Mature Width:  20-40 feet


Italian Stone Pine keeps its pyramidal shape
as it matures, but will eventually thin out at the
bottom and become wider on top.


Italian Stone Pine (Pinus pinea) - This one works great as a holiday tree, even in smaller sizes.  The branches are numerous and full, and new needles on the branch tips are a beautiful blue-green color.  The nuts are edible.
Mature Height:  30-50 feet in Tucson
Mature Width:  30-40 feet


Ponderosa pine on top of Mt. Lemmon


Ponderosa Pine (Pinus ponderosa) - I love the long, shaggy needles on this guy.  Ponderosa pine likes higher elevations, so I wouldn't try planting one unless you're in one of those cooler microclimates.  This tree grows quickly under the right conditions and can grow quite large.  Its furrowed red bark and picturesque form get more beautiful as it ages.
Mature Height:  50-80 feet (probably on the smaller side in Tucson)
Mature Width:  20-30 feet


Japanese black pine is a non-conformist;
it rarely grows with a straight trunk
and evenly spaced branches.


Japanese Black Pine (Pinus thunbergii) - This pine gets big in its natural habitat but stays on the smaller side of its size range here in Tucson, and is often pruned to be kept even smaller (there are some nice photos of bonsai specimens out there on the internet).  It grows slowly, takes well to pruning, and tolerates Tucson's weather conditions, so long as it has adequate drainage.  Because of its naturally twisted form, this is the tree to pick if you're really going for a Charlie Brown Christmas!
Mature Height:  20-50 feet in Tucson
Mature Width:  20-40 feet


The perfect little Christmas tree growing on Mt. Lemmon


Douglas Fir (Pseudotsuga menziesii) - This species is often for sale as fresh cut or living trees, and it's easy to see why!  In their youth, they're naturally shaped like perfect little holiday trees, with perfect branch spacing and strength for ornaments.  However, they do better at higher elevations and in cooler microclimates.
Mature Height:  40 - 80 feet (much taller in cooler climates)
Mature Width:  20 - 30 feet


Upright rosemary growing in containers at the nursery


Upright or Trailing Rosemary (Rosmarinus officinalis) - Upright rosemary is more commonly seen sheared into table-top holiday trees, but trailing rosemary can be given the holiday treatment as well.  This aromatic shrub doesn't mind being pruned, and does well in containers with excellent drainage.  The upright form tends to have a more savory flavor for cooking, while the trailing varieties are often more useful for medicinal or cosmetic purposes.
Mature Height:  1-6 feet (depending on cultivar)
Mature Width:  3-6 feet (depending on cultivar)